Equipment for Grinding Grain, Baking, and Slicing Bread
This post lists the equipment you need for grinding grain, baking, and slicing bread.
Grinding Grain
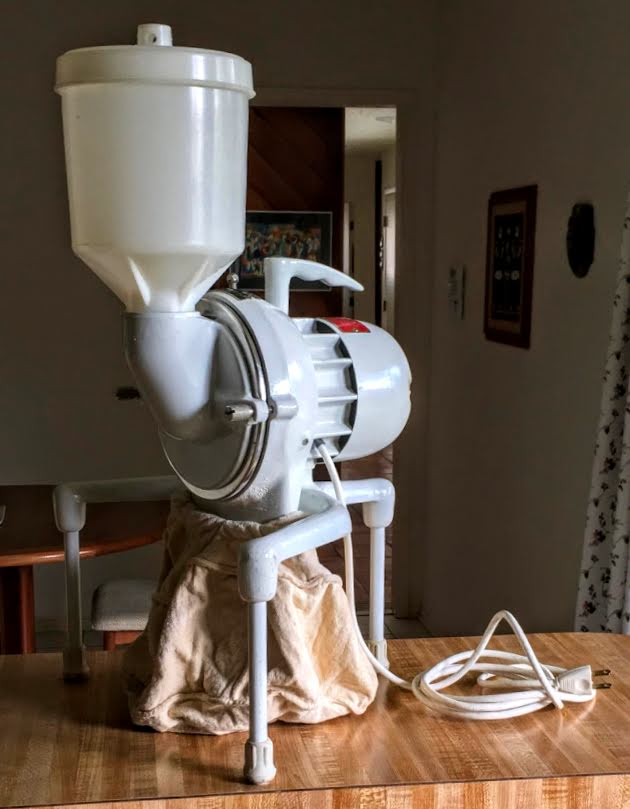
Lee Household Flour Mill
Grains such as rye and wheat contain oil, which thus is contained in whole grain flour. The oil contained in the flour oxidizes gradually and eventually becomes rancid. The special smell of store-bought whole wheat flour stems from that oxidization process. We do not want any such smell, nor do we want to have partially oxidized oil in our bread.
This leaves only one option: Each time we bake, we grind grain to get the needed flour. If by chance a small amount of flour is left over, we store it in the freezer for the next time.
For more than 30 years, we have used a Lee Household Flour Mill to grind grain. The mill launches the grain from a funnel on top into a round chamber whose main feature is a hollowed-out grind stone. Whirling blades inside the chamber pitch the grain against the grind stone surface, thus breaking it up.
The flour pieces exit when they have become sufficiently small. The whirling blades also pump some air through the chamber, thus cooling everything, and the flour is literally blown into a canvas bag at the bottom. Due to this design, the exiting flour is slightly warm but not hot, and thus doesn’t suffer any heat damage.
The bag cannot be completely emptied of all flour despite vigorous shaking, so I store the bag in the freezer to prevent small critters from settling in there.
When we purchased the mill, it cost around $200. For current offerings, search the Internet for “Lee Household Flour Mill.” The latest model costs $700-800 and looks a bit different.
Used mills of the original design are offered on eBay for less than $200. Make sure the motor is in good condition. Also check whether you get the funnel with cover and the cloth bag. A missing funnel or missing funnel cover is a deal-breaker. But if the bag is missing, it wouldn’t be difficult to make one from heavy canvas material that allows air to pass through, assuming you have access to a sewing machine.
The mill is noisy. I run it in the garage and wear a hearing protector. But except for that drawback, it is a terrific mill for rapidly producing large quantities of coarse flour as well as for grinding a limited amount of fine flour, say two cups at a time.
When used this way, the mill should last indefinitely. But if you try to produce fine flour for hours on end, the odds are that you will burn up the motor.
For other mills, prices range from around $200 to $700 (2018); for details, search the Internet for “Flour mill.” We have not used any of these mills, so cannot judge performance. But from the reviews, it seems that low-cost models have problems with overheating of motors and low production rates. Some are quite noisy, too. But then our Lee Household Flour Mill is noisy as well.
Baking Equipment

Basket for rising bread loaf (German Gärkörbchen). Photo Steffen Heinz CC3.0
You need a reasonably sized mixing bowl. For the batches described in this blog, we use a 4.5 in. high bowl with 13 in. diameter at the top. For larger quantities, we have a 5 in. high bowl with 16 in. diameter at the top.
You need the following for the baking process:
– two baking sheets, size 12×17 in. or larger
– two 5×9 in. bread pans, with small variations in size allowed
– two cooling racks size 10×16 in. or larger.
Sourdough rye-wheat bread is baked on a baking sheet and not in a pan. When the bread loaf rises before the baking, the loaf must be constrained by some device so that it does not ooze apart.

Open box with slanted sides
The traditional method uses a basket for rising dough (German Gärkörbchen, literally, fermentation basket), available from German suppliers on the Internet; search for “Gärkörbchen” or the simpler “Garkorbchen” on google.de.
Such a basket works well when a number of loaves are baked in sequence. In that case, the basket is reused a number of times before the flour is washed off in a final cleaning. That process must be carefully done since flour has been pushed into small crevices of the basket.
But we bake just one loaf at a time. To avoid the need for the tedious cleaning of the basket after baking just one loaf, we made our own device from plywood.

Connector pins of box
It is an open box with four slanted sides held together by connecting pins, with one pair of pins in each corner.
The size of the box is 6×11.5 in. at the bottom and 9×14.5 in. at the top. The sides are cut from 5/8 in. thick plywood. The four sides rest on, but aren’t attached to, a rectangular 1/4 in. thick plywood piece, size 9×14 in.
The four corners of the sides are marked with the letters A, B, C, and D to simplify assembly: We push the four sides together and place them on the plywood base. The friction produced by the slanted walls holds the pins in place.
We didn’t assemble the box permanently to simplify cleaning: We just take the box apart and wash the flour off each piece under running hot water. The box works for any size bread loaf, including a monster 8 lb. rye-wheat bread that we bake occasionally.
Slicing Bread
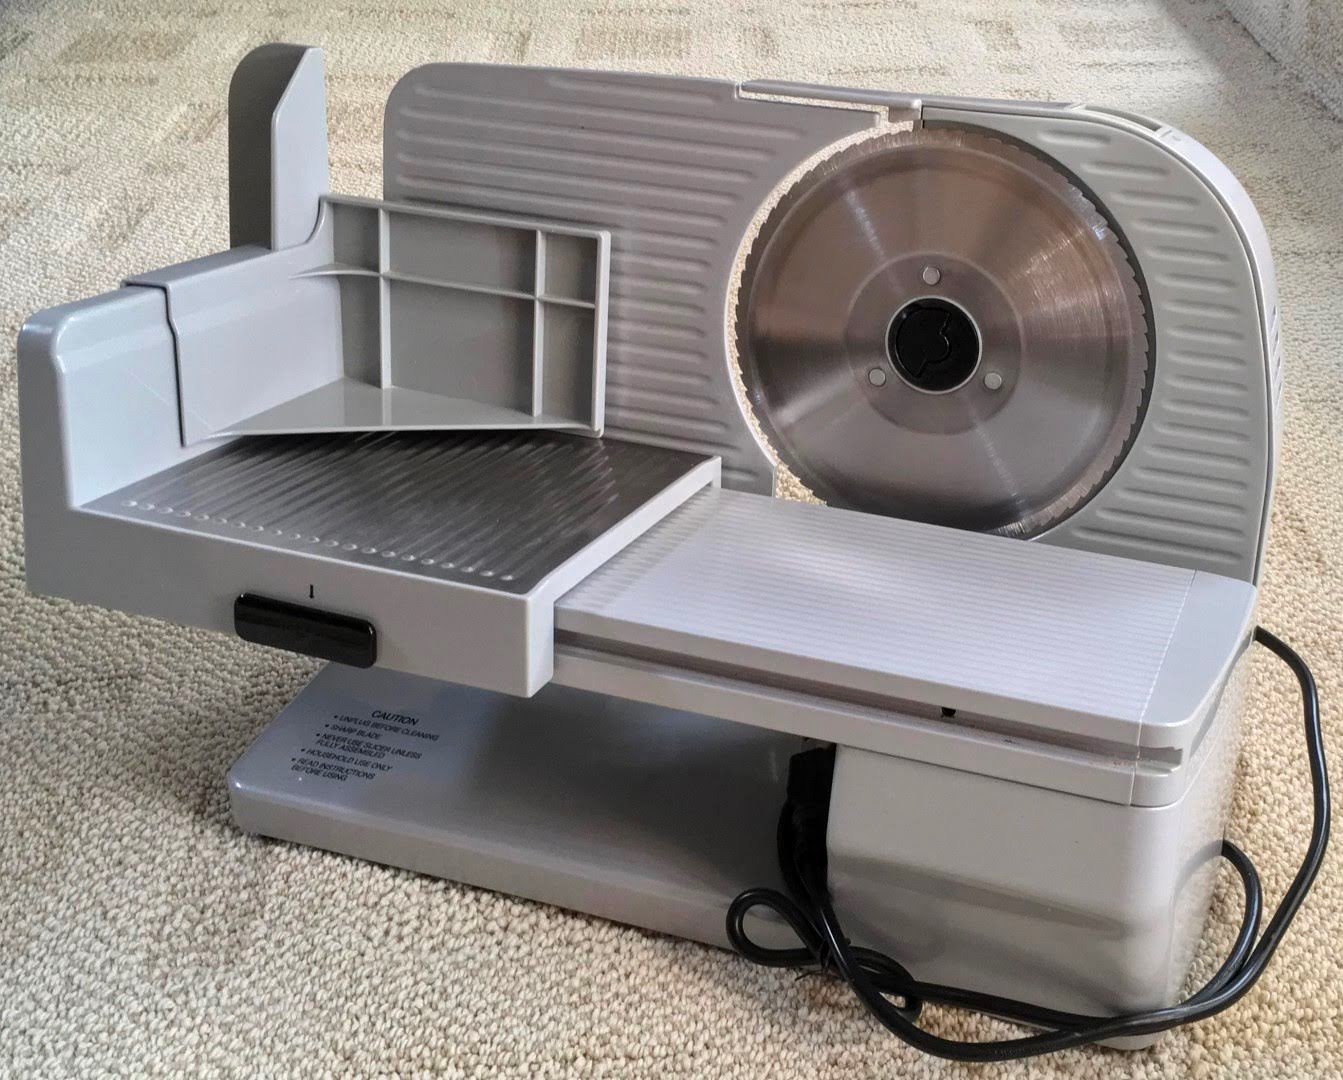
Chef’sChoice premium electric slicer
The sourdough breads produced with our methods have a crisp crust. In addition, the rye-wheat bread with whole rye grain (Schwarzbrot) is rather dense. All this makes hand-slicing of the bread a bit difficult. We could do it, but it wouldn’t be fun.
Fortunately, excellent electric food slicers are available at reasonable cost. For more than 20 years, we have used the Chef’sChoice premium electric slicer. It is still available, costing less than $150 (2018).
For suppliers, search the Internet for “Chef’sChoice premium electric slicer.” The slicer has a powerful motor with strong reduction gear. It allows precise sizing of the slices, and is easy to clean.
During our first use of the slicer many years ago, we processed rye-wheat bread with whole grain rye. Amazingly, each slice broke into pieces. Why did this happen?

Adjustment mechanism of slicer. Triangle of yellow paper stands for the removed tip.
Carefully looking at the operation, we realized the following. The slicing wheel in the photo on the left turns clockwise. When the slice separates gradually from the loaf, it is bent away from the slicing wheel due to the bulge of the motor housing.
But just as the slice separates from the loaf, it is also rotated by the slicing wheel due to friction and is pushed into a narrowing space formed by the bottom of the motor housing and the bottom tip of the adjustment plate. Essentially, the slice is twisted and thus breaks up.
In a bold move, we cut off the tip of the adjustment plate. The photo shows the modified adjustment mechanism; for clarification we have added a yellow triangular paper piece that stands for the removed tip. This modification resulted in a perfect slicing process.
Removal of the tip exposes a bit of the cutting wheel, though in a rather inaccessible location. But if you reached down there while the cutting wheel is turning, you would get hurt.
I am not concerned about this for myself: Whenever the slicer is turned on, I never reach with my hands into any region close to the cutting wheel. But just to be clear: I do not accept any liability for this modification. So if you modify the slicer, you do so at your own risk.
Of course, a better solution would be a modified design: The bottom tip of the adjustment plate should not be straight, but should be bent away from the cutting wheel. The extent of the bent should be determined by experiment.
We have not had any experience with other slicers, so are unable to make additional recommendations. For the various offerings, search the Internet for “Food slicer.”
Post Navigation
Baking Sourdough Bread: Overview
Purchasing Grains and Flours
Equipment for Grinding Grain, Baking, and Slicing Bread ← You are here
Getting and Processing Sourdough Starter
Formulas for Baking Sourdough Rye and Wheat Breads
Have any questions or feedback about the equipment list for grinding grain, baking, and slicing bread? Please share your thoughts in the comments.
