Sliding Tray for Computer Monitor

Sliding tray for right-hand-side monitor, in forward position
When we needed a sliding tray for a computer monitor but could not find such a tray on the Internet, we decided to design and build one ourselves. This post describes tells how you can build that sliding tray yourself.
The tray has the following features. First, ball bearings assure that the movement requires minimal effort. Second, when the second monitor is pulled forward, the shelf clears the desk surface by 1 in. Thus, the shelf moves above pencils, pens, erasers, notepads, even books of modest size.

Right-hand-side monitor pushed back
A sliding monitor tray can be useful in several settings. For example, if you have a computer with a single monitor, you can push back the monitor when the computer is not use. Or, as was the case for us, if you have two wide side-by-side monitors and the second monitor is not used all the time, you can push back that monitor when it isn’t needed.
Here are the step-by-step instructions for building the tray.
Materials
1 piece of 1 in. thick plywood, size 15 1/2 x 12 in. It is used for the shelf. If you do not have 1 in. thickness available, you can glue two thinner sheets together, as we did. We do not recommend going much below 1 in. thickness since the platform needs to be very sturdy and must handle up to 20 lbs with no perceptible bending.
1 piece of 5/8 in. thick plywood, size 19 x 13 in. It is used for the base plate. Do not go below 5/8 in. thickness if you want to achieve the 1 in. clearance of the desk described above when the monitor is pulled forward.
2 wood pieces 12 in. long, size 1 1/4 x 1 3/4 in. They are used for the side supports. We made the two pieces from remnants of earlier projects. In particular, we made the two 12 in. pieces by lengthwise cutting a 12 in. long piece of a 3 x 4 stud, which actually is 2 1/2 x 3 1/2 in.
Felt material or thick cloth, size 19 x 13 in. It is glued onto the bottom of the base plate so that the desk surface is not marred by the bottom of the base plate.
A pair of very strong, very reliable, drawer slides with ball bearings, 14 in. long when not extended. We obtained them at Home Depot. They are made by Liberty and cost less than $15.
2 C clamps. The size must be at least the thickness of the base plate plus that of the desk surface.
Attachment of Slide Pieces to Shelf
1. Mark one of the two 16 in. long edges of the shelf as the forward edge. Also mark the nicer looking side of the shelf as the top side of the shelf.
2. On each 12 in. long side of the shelf, mark half the thickness with a centerline.
3. Take each slide apart. This is done by depressing a small lever; see the instructions supplied with the slides. There is a single piece and a second part consisting of two nested pieces that can be extended. Below we call that second part the compound piece.
4. Attach the single pieces on the 12 in. long sides of the shelf piece, as follows.
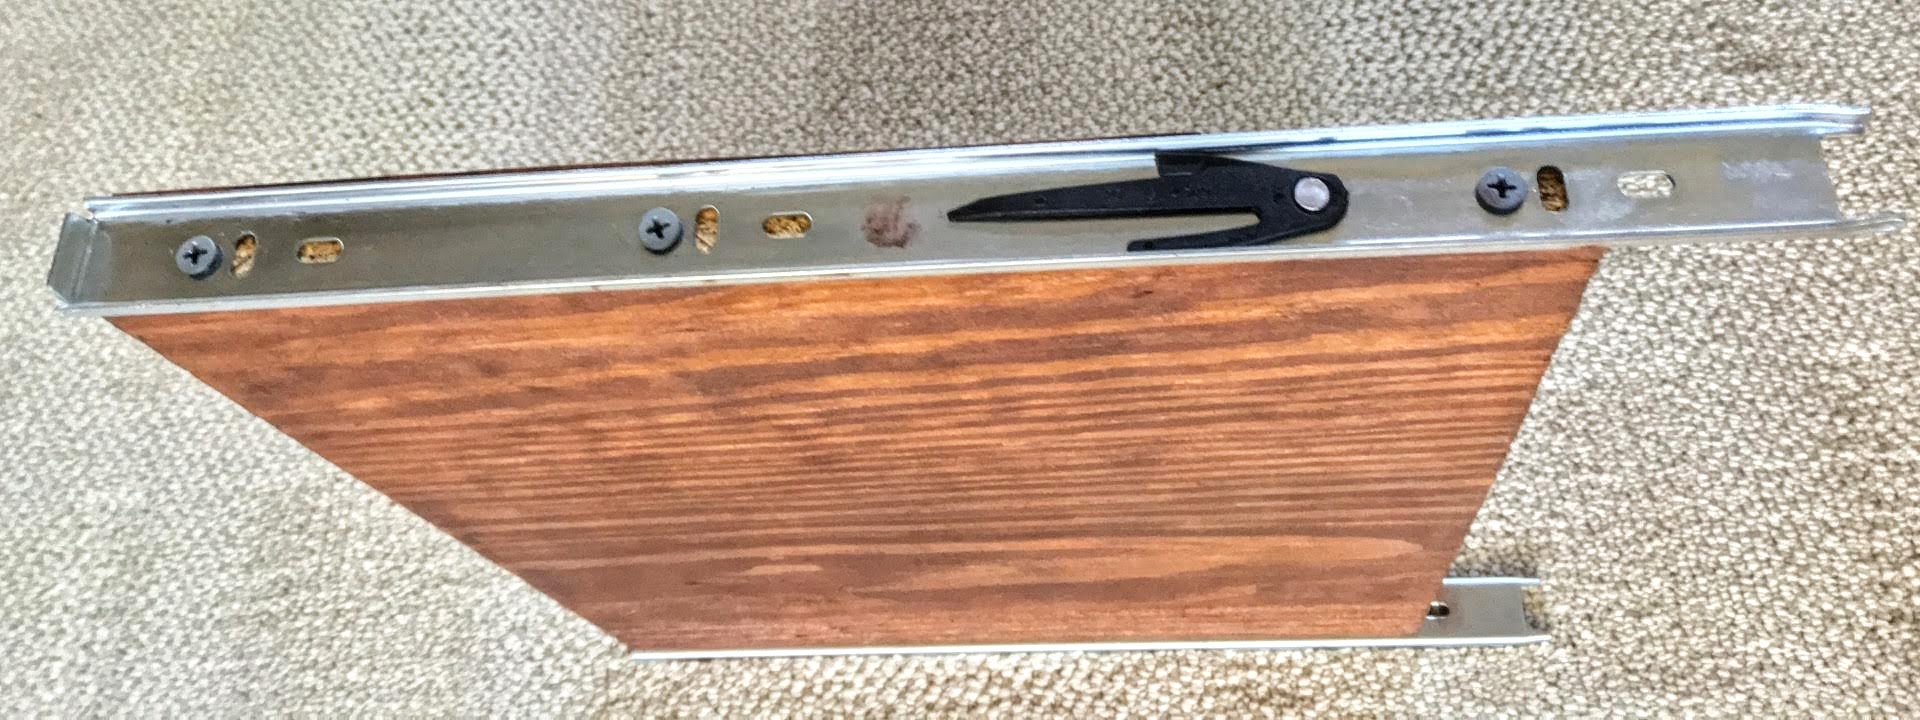
Shelf with attached slide pieces, leading shelf edge on the left
The forward part of each slide piece must be flush with the forward edge of the shelf, and the holes in the slide must be centered on the centerline marked earlier. In the photo, the leading edge of the shelf is on the left. The photo also shows the black plastic tab that locks the single piece and the compound piece together.
Use 3 drywall screws, 1 1/4 in. long, to attach each slide piece to the shelf. For this, first mark the position of the screws and drill the plywood to 1 in. depth with a very small drill for easy installation of the screws. Then attach the slides.
Do the above process in several steps, starting with a tentative attachment where you use very short and small screws. For a test, lay the shelf with the tentatively attached slide pieces on a flat surface. It must lie total flat and must not permit any tilting.
If it does not lie totally flat, you must redo the attachment until that effect is achieved. Do not accept anything but perfection, since otherwise the slides will be
binding in the final installation.
5. Assemble the single slide pieces and the compound pieces again. Make sure that you can easily extend the slides and push them together without any interference by the heads of the screws. If there is any interference, countersink the holes of the slide piece attached to the shelf so that the screw heads do not stick out as much. In our case, this was not needed.
6. A final test: Lay the shelf with the assembled slides on a flat surface. It must lie totally flat, without any tilting possible. If that is not the case, the slides do not align, and you must redo the attachment process.
Attachment of Compound Pieces to Side Support Pieces

Shelf support side trimmed with 45 deg cuts
You may want to change the side support pieces so that they aren’t just log pieces. For this, we used a table saw to cut off edges lengthwise and in front and back at a 45 deg. angle; see photo at left. If you have access to a router, you can create a prettier profile.
Separate the slides again into single and compound pieces. Attach the compound slide pieces to the side supports so that the compound pieces, when collapsed, and the side supports are flush in front. When placed on a flat surface, both the shelf support piece and the compound piece must rest on the supporting surface.
This sounds easier than done. Tentatively do such attachment, then check whether the condition is met. In particular, there is a tendency of the compound piece to rest on the surface, while the side support does not. For attachment, use the screws supplied with the slides. They are quite short, but suffice.
Assembly of Shelf and Side Supports
Assemble the shelf and the two side supports by assembling the slide on each side. Place the assembly on a flat surface. As before, there should be no tilting possible. If this is not the case, find the cause and fix it before proceeding.
Test whether the shelf can be easily moved by clamping both support pieces to a flat surface and then moving the shelf back and forth. There should be no resistance
whatsoever.
Attachment to Base Plate
Mark one of the two 15 1/2 in. edges of the base plate as the leading edge of that plate. Select the prettier of the two sides of the base plate as the top side.
Place the assembly on the base plate, with the leading edge of the plate flush with the shelf when fully retracted. Thus, not only the shelf, but also the side supports line up with that leading edge.
In the back, the base plate sticks out beyond the shelf. The metal slides stick out even further beyond the base plate. The reason for this design will become clear later.
Looking down on the assembly sitting on the base plate, small areas of the base plate extend beyond the side supports in front, and beyond the side supports and the outside of the slides in the rear. Cut off this excess. For us, this trims off triangular pieces in front and mostly triangular pieces in the rear. See also the photo below, where the shape of the felt material matches that of the base plate.
Attach the base plate to the assembly of shelf, slides, and side supports. The screws go from the bottom of the base plate into the side supports.
First do a tentative attachment so you can test that the slide moves in and out without any resistance. Once that is assured, do the final attachment with drywall screws of appropriate length that depends on how much you have modified the side supports. Use three screws for each of the two side supports.
Finishing
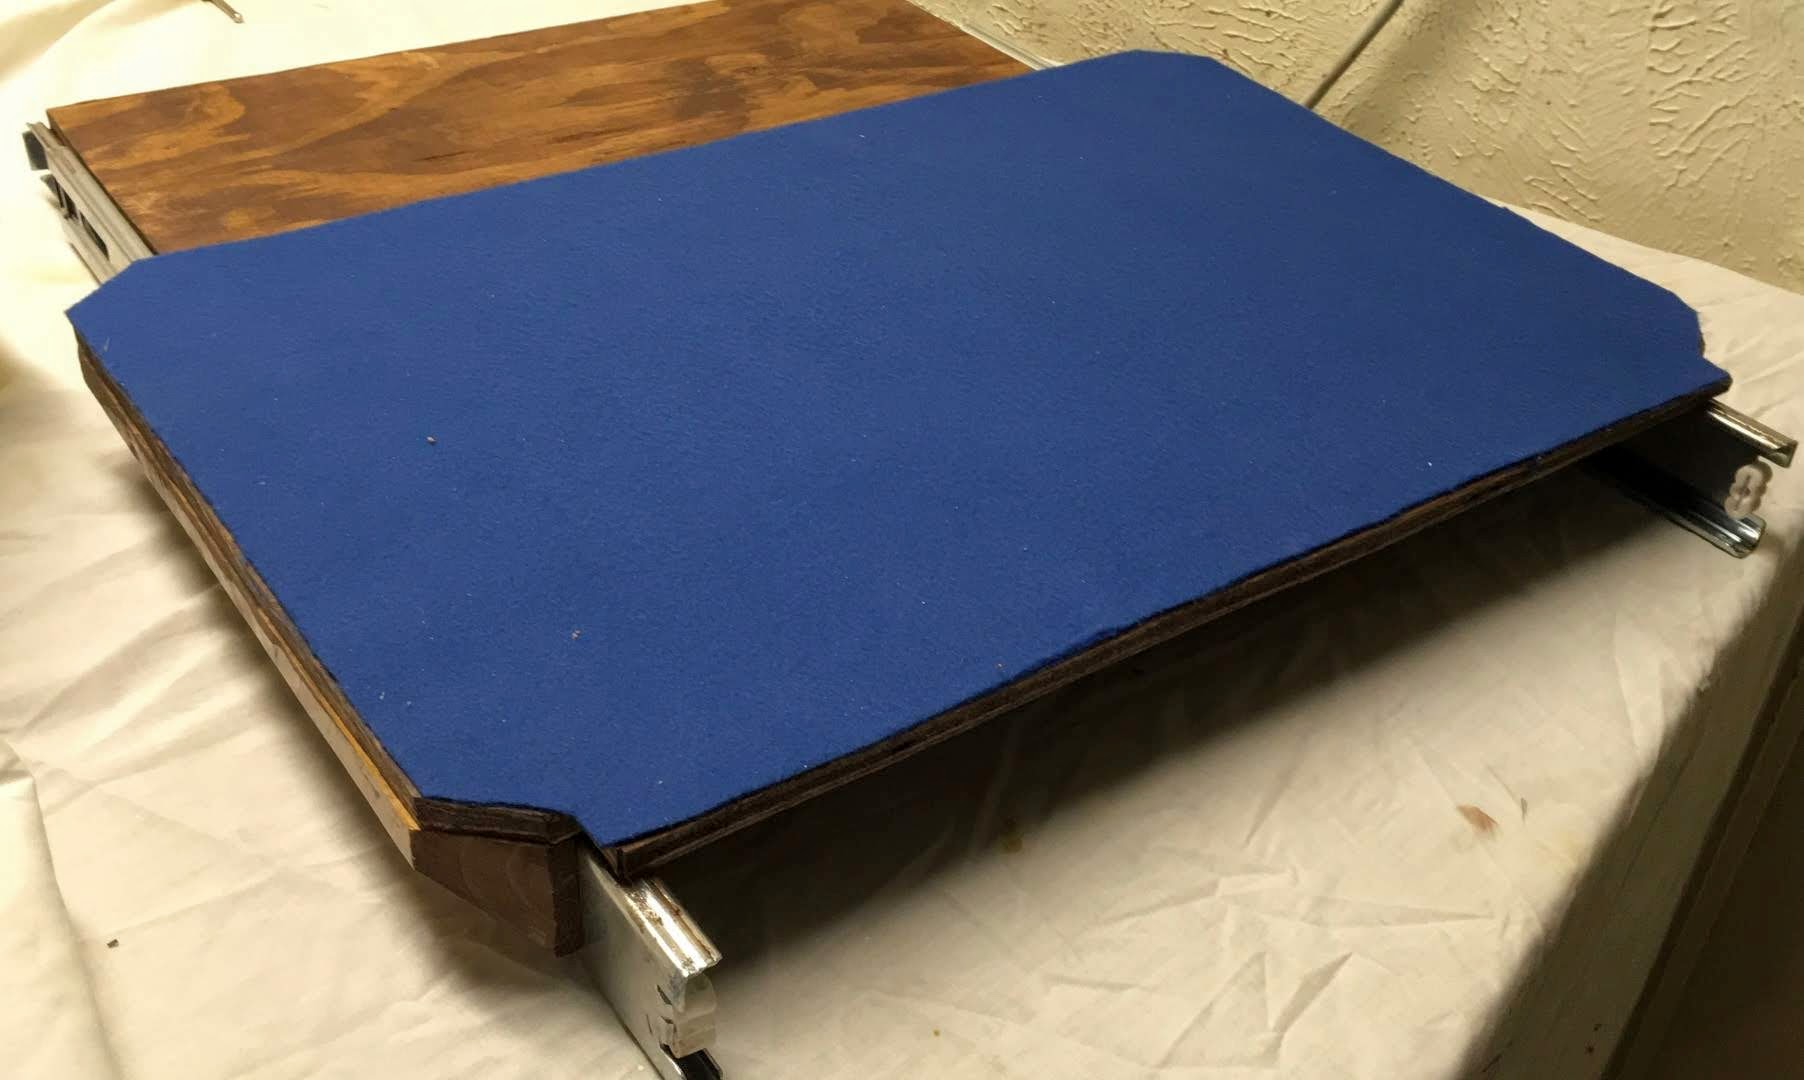
Final assembly with felt material added
The edges of the shelf and base plate likely have small rectangular holes. Fill them with plastic wood.
Sand all wooden surfaces until smooth.
Stain the surfaces, let dry, and apply a finish. We do not like to apply oil paint to wood due to the prolonged smell, and instead use Tung Oil Finish.
Finally, cut the felt or cloth material to fit the base plate, and glue in place. The photo also shows how the base plate has been trimmed at the four corners.
Installation
When the shelf with monitor is pulled forward, it wants to tilt down since the center of gravity moves beyond the base plate. To prevent this, the rear of the base plate must be attached to the desk by some device.

C clamp holding support plate to desk
For this, we line up the rear of the base plate with the rear edge of the desk and use two C clamps to firmly attach the plate to the desk.
There is one C clamp on each side. In our case, the C clamps are not visible since the desk is positioned against a wall. But for a free-standing desk, you can add a wood cover that sits on the portion of the slides extending beyond the base plate and thus hides the C clamps as well as the ends of the slides.
You may have wondered why we use relatively long 14 in. slides. The reason is that, even if the desk has considerable depth, the bottom plate can be lined up with the rear edge of the desk, yet the monitor can be moved forward sufficiently to line up with the fixed monitor.
Monitor Installation

Completed installation
Place the monitor on the shelf. Move the shelf forward until the monitor is next to the stationary monitor. Adjust the height of the two monitors so that any window moving from one monitor to the other moves horizontally with virtually no vertical displacement.
As an aside, the sliding tray with keyboard and mouse pad also uses two Liberty 14 in. slides. The keyboard tray is a 5/8 in. thick plywood piece, size 26 1/2 x 9 in. The side supports are 14 in. long pieces cut from a 3 x 4 stud and used without any modification since they are hidden under the desk. The assembly of tray, slides, and support sides is attached with screws to the desk. The installation is such that, when the tray is pulled forward all the way, the keyboard is in position for typing.
Almost last, but not least
Before embarking on this project, test that your computer can really drive the two monitors as intended. This is not so difficult to achieve with a PC.
But with a laptop it is a different story. We discuss use of a laptop with two external monitors in a separate post. That case also involves the complicating aspect that the two monitors may have different resolution, yet a window moving from one monitor to the other should not change size. This is the case for the two monitors used here.
Disclaimer
Anyone using the information of this post does so at his/her own discretion and risk, and no responsibility or liability is expressed or implied. Bottom line, we are responsible for nothing.
