Rolling Tool Shelf

Rolling tool shelf
This post describes a rolling tool storage unit that is inexpensive, easy to make, and convenient to use. Due to an irregular spacing of the shelves, one sees all tools at the same time without bending down or standing on tip toes.
Car mechanics have rolling tool boxes with a number of drawers. These tool boxes are quite expensive. Even ignoring that aspect, they are not so useful for a shop in the garage unless the tools are used day-in day-out. The main reason is that one tends to forget which drawer has which tools, so time and again two or three drawers are opened to get just one tool.
Another choice are peg boards mounted on the wall. The tools hang on hooks. There are two downsides. Not all tools can be hung on a hook, and even if that is worked out, one quickly run out of hooks and wall space. Besides, one must always walk up to one of the peg boards to get a tool.
Then there are regular tool boxes. But they are filled up soon and one must dig into them to find a tool.
For years we had faced these unsatisfactory choices in our garage and couldn’t come up with a good solution. As a compromise, we kept the tools in some open boxes on the workbench. But the work space on the bench became smaller and smaller, until one day we were sufficiently motivated, indeed irritated, to think hard about the problem.
This post tells about our solution.
Rolling Metal Storage Unit
The key idea is a metal storage unit made by HDX that is extraordinarily sturdy. It has 5 shelves, each of which handles up to 350 lbs of evenly distributed load. Four HDX industrial casters, sold separately, handle a total of 600 lbs. The unit is painted black. Total cost as of 2018 is about $80. Google “HDX storage” to find suppliers.
The dimensions of the metal storage unit are 36 in. width x 16 in. length x 72 in. height without casters. The casters add 5 in. to the height.
On the Internet, other metal storage units with casters are offered. When we considered price and quality, HDX seemed unbeatable.
Trays

Wooden tray before addition of strips for the compartments
Each shelf of the storage unit is made of wire mesh, which is unsuitable for tool storage. We decided to make wooden trays that are placed on the shelves. The trays fit within a raised border of the shelves and thus cannot slide off.
The bottom of each tray is 1/4 in. thick plywood, size 35 in. width x 15 1/2 in. length. The corners have round cutouts to accommodate the four poles of the storage unit.

Corner cutout of tray
The cutouts are made with a 1 1/2 in. hole saw before the tray material is cut from the plywood sheet.
The edges of the tray are 5/8 in. wide and 1 in. high wood strips. We cut the strips from 3 x 4 studs to reduce costs. The strips are glued to the plywood. We did not have enough clamps to hold all those edges at the same time, so used small nails after applying the glue.
Almost all tools lie flat in the trays. The 1 in. high edges prevents tools from falling off when the storage unit is moved around.
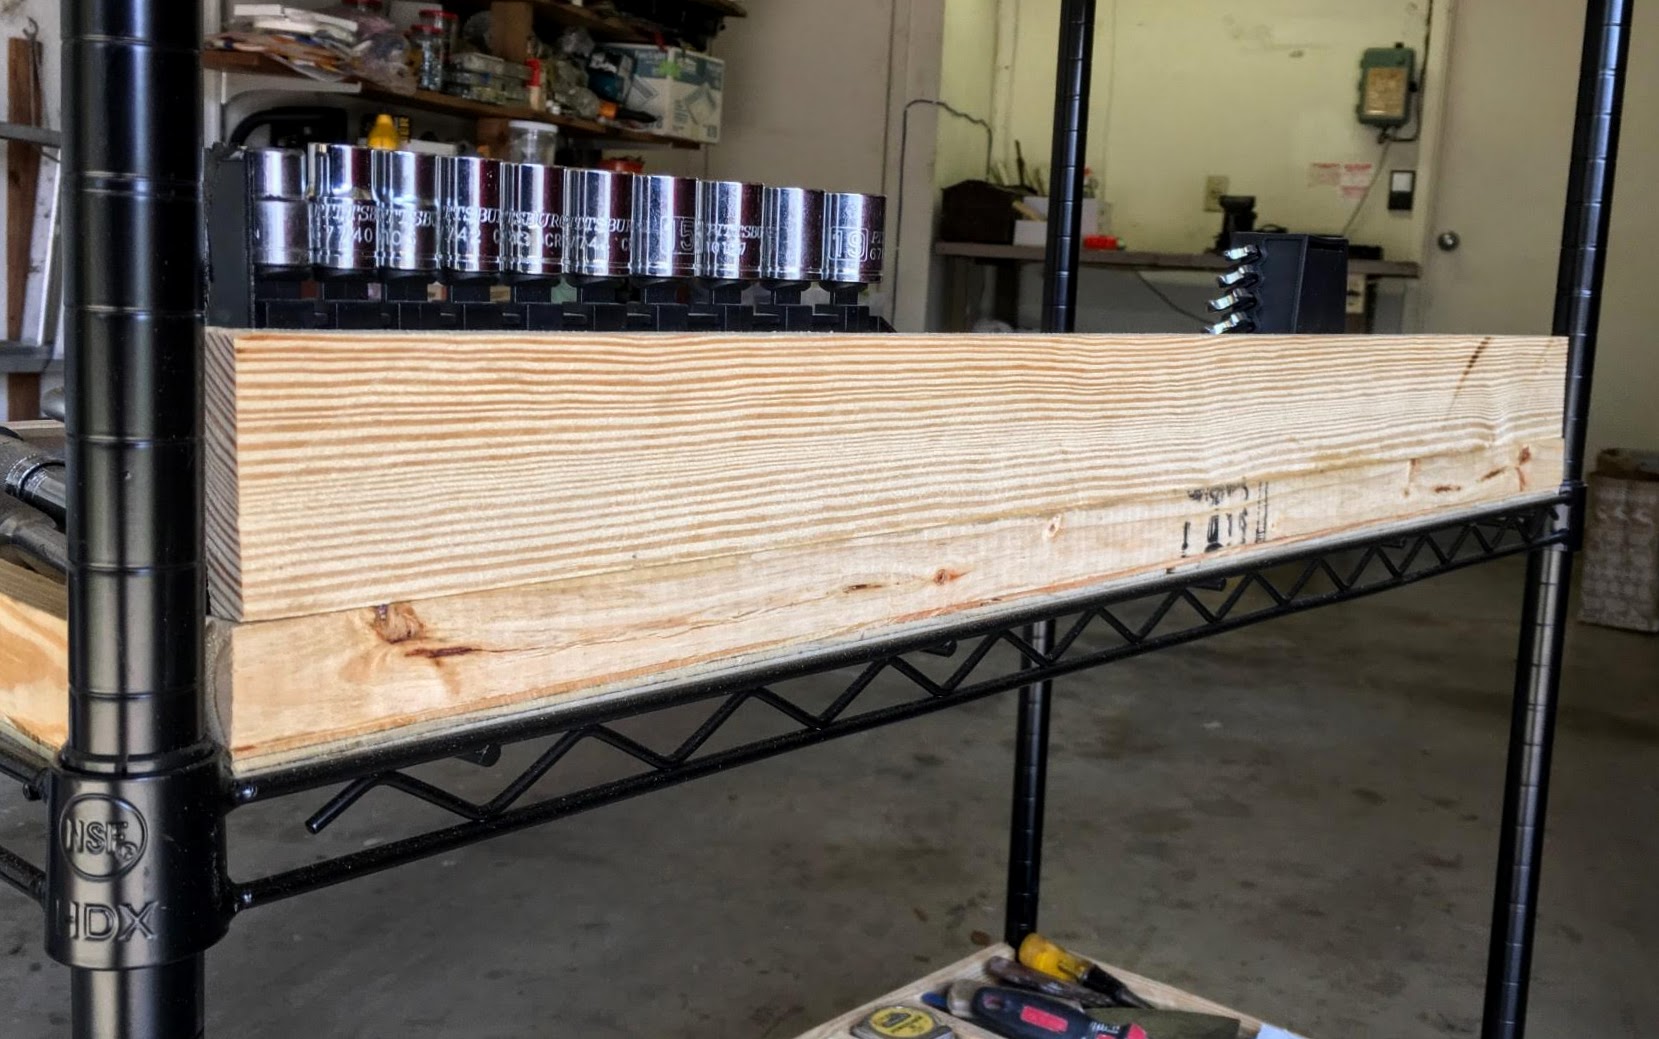
Additional board to hold socket and wrench sets in place
An exception are two socket and wrench sets. For the tray holding them, we glued a 2 1/4 in. wide board to the edge in the back of the tray.
Spacing of Shelves
We have always been reluctant to store tools on shelves. The nagging image was that one has to bend down or stretch up to search for a tool.
Then came the right idea. We tentatively selected a shelf spacing, placed ourselves 3 ft from the front of the unit, and then checked which shelves we could fully see. The goal was to have all shelves in full view without bending over or standing on tip toes.

Visibility of shelves
By trial and error we found a configuration that satisfies this, with the exception for the highest, 5th, shelf. It is difficult to look into the fifth tray anyway, and at the moment we do not use it all. The plan is to store there some large but lightweight items.
The spacing is as follows. Going up from the bottom, the successive vertical spacing of shelves is 17 in., 14 in., 11 in., and 9 in.
Arrangement of Tools
Each shelf is dedicated to a certain type of tools: The bottom shelf has rarely uses tools such as spatulas and files. The second shelf from the bottom has wrenches and sockets, the third screwdrivers, punches, and snips, and the fourth pliers and clamps.
On each shelf, the most frequently used tools are on the left hand side.
We first tried a layout with compartments of equal width, using strips of same dimension as the bordering strips. The equal spacement turned out to be very inefficient. Some compartments had too many tools, while others were hardly used. Instead, we placed the tools intended for one compartment into the tray, added a dividing strip, added tools for the next compartment and the next strip, etc. This produced efficient storage adapted to our tool collection. For easy modification, if ever needed, we used just a dab of glue at each end of each strip. A strip can thus be removed by wedging a knife under the ends of the strip.
Protection Against Dust
At first, we thought the unit should be covered with some tarp or cloth when not in use. It turns out that this is not needed.
In a garage, the air moves very little, and dust particles fall down more or less vertically. Thus, the top shelf does collect dust, but the shelves below hardly do at all. And if there will ever be some dust, we will open the garage door and blow off the dust with compressed air.
Caution
One rule must be observed:
Never, ever roll the storage unit sideways.
If one of the coasters bumps into something and the unit suddenly stops, the entire unit will tip over due to the high center of gravity. You don’t want to be there when that happens.
So always move the unit lengthwise, and rotate it only after it has come to complete stop.
Evaluation
You may chuckle about the scientific approach to the placement of the shelves and tools. But due to that system, it took little time to get familiar with the arrangement, and now tool selection is done with a glance at the appropriate shelf.
The only regret is that I wish I had implemented this storage system years ago.
